Lecture 8 - Git Ready
Overview
In this lecture, we cover Git and GitHub in more detail. Specifically, we discuss:
- Initializing Git repositories and
.gitignore - Git workflows (
git add,git commit) - Checking your Git status and history (
git status,git log,git diff) - Branches, moving around, merge conflicts (
git branch,git checkout) - Undoing changes (
git restore,git commit --amend,git reset)
References
This lecture contains material from:
- Happy Git (Jenny Bryan) https://happygitwithr.com
- Pro Git (Chacon and Straub)
- Chapter 12, Data Science: A First Introduction with Python (Timbers et al. 2022)
- The Missing Semester Course, MIT
Basics of Git and GitHub
About Git and GitHub
Git is a Version Control System (VCS). It is a useful tool for easily tracking changes to your code, collaborating, and sharing. More specifically, Git manages the changes in a set of files – called a repository.
GitHub is a repository hosting service. It provides storage for Git-based projects on the internet. This allows collaborators to see your files, sync changes and make changes themselves.
Setting up
- If you do not have a GitHub account, create an account on https://github.com. (Advice on registering for GitHub and selecting a username here).
- Install git on your computer. If you have a Mac, it comes with XCode command line tools link. For Windows, you can download it here. Here are some more installation guides for different operating systems.
Shell
We will be using Git via the shell (or command line). While the learning curve is higher, it is more precise. Git GUIs can sometimes do strange things.
Here is a nice guide to the shell.
What does Git do?
Git stores snapshots of a repository over time.
The repository history is not automatically generated; Git must be explicitly told when to record a version of the project. These records are called commits. Commits contain a snapshot of the file contents as well metadata about the repository at that time the commit was created (who made the commit, when it was made, etc.).
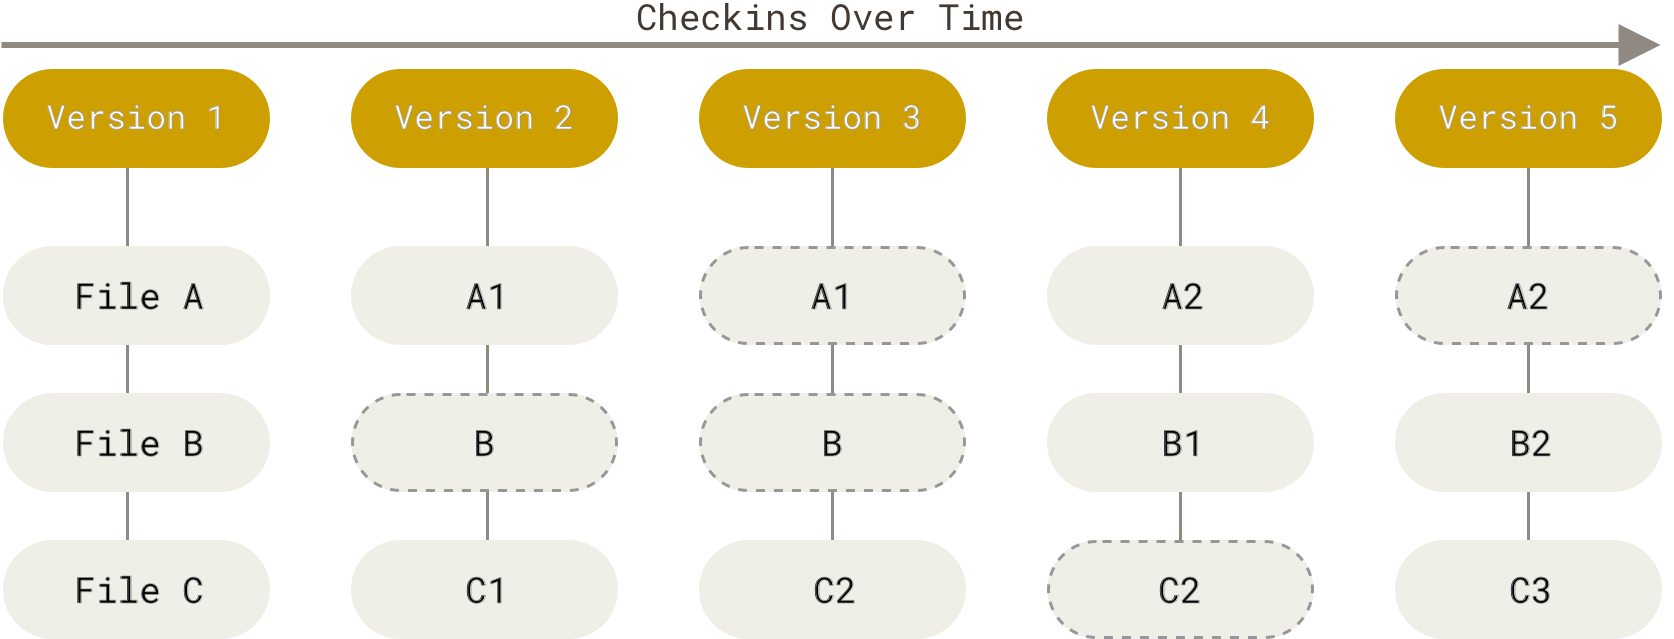
Git history
The above figure shows a linear progression of snapshots.
In Git, the history does not have to be linear. Specifically, a Git history is a directed acyclic graph (DAG) of snapshots. This means is that each snapshot in Git has a set of “parents”, the snapshots that preceded it. It’s a set of parents rather than a single parent (as would be the case in a linear history) because a snapshot might descend from multiple parents.
For example, visualizing a Git history may look like:
o <-- o <-- o <-- o
            ^
             \
              --- o <-- o
Each o corresponds to individual commits (snapshots). After the third commit, the history branches into two separate branches.
Branching is helpful if we want to try some new code but we do not want to disrupt our main project. We can start a new branch - if the branch is successful, we can merge it back to the main project. If it is unsuccessful, we can just go back to our main project, which is unchanged!

When we start a Git history, by default we are on the main branch. For example, in the linear history scenario, we have one branch called main.
Git config
After installing Git, introduce yourself to Git! The following commands store your name and email in Git’s configuration settings.
On your local computer, in Terminal (or other shell), run:
git config --global user.name "Jane Doe"
git config --global user.email "jane@example.com"
substituting your name and the email associated with your GitHub account.
To see the current config settings, run git config --global --list.
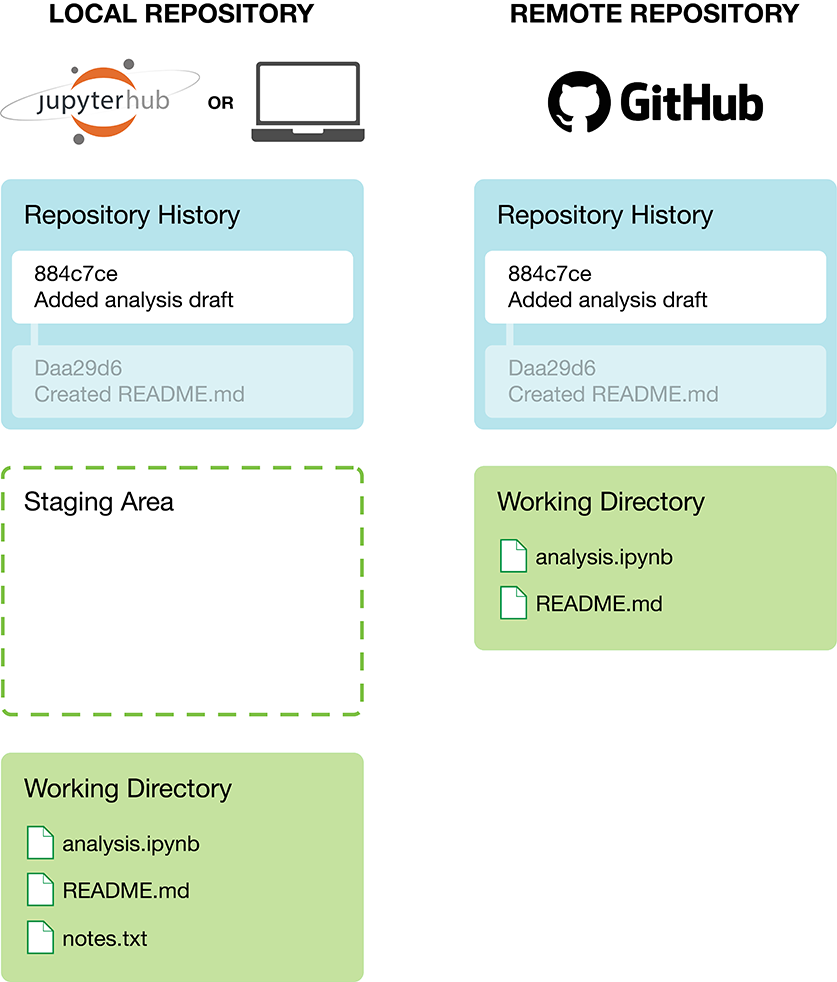
Local and remote repositories
Typically when we use version control, we create two copies of the repository.
Local repository: this is the repository, usually on our own computer, where we create, edit and delete files.
Remote repository: this repository is stored on a repository hosting service like GitHub - this is easily shareable with collaborators.
When working on files in your local repository and making changes, these changes will only exist locally. To update the remote repository, you need to explictly push your local commits to the remote repo. We will talk about how to push commits later.
Local repositories
Initializing a local repository
You can set up a folder on your local computer with Git tracking as follows:
- in Terminal (or other shell), navigate to your local folder
cd path/to/my/folder- In your folder, run
git initWhen you run git init, it creates a hidden .git folder in your local repo. This is how Git keeps track of the snapshots. If you want to delete all git history and configurations, you can delete the .git folder. If you want to use Git with this project again, you would need to reinitialize with git init (this would be a new Git repo with no connection to previous history.)
Basic local workflow
In our local repo, our files are in three main states: modified, staged, and committed:
modifiedmeans that you have changed the file but have not committed it to your history yet.stagedmeans that you have marked a modified file in its current version to go into your next commit snapshot.committedmeans that the data is safely stored in your local history
The basic Git workflow goes something like this:
You modify files.
You selectively stage just those changes you want to be part of your next commit, which adds only those changes to the staging area.
In Terminal (or other shell), navigate to your folder. To stage the file
my_file.txt, rungit add my_file.txtIf you want to stage all file changes, run
git add -A(Ideally you don’t stage everything. It’s simpler to have only a few file changes per commit. Also, you may accidentally stage files you don’t want.)
You do a commit, which takes the files as they are in the staging area and stores that snapshot permanently to your Git directory. Each commit requires a message - you should make it informative.
git commit -m 'your message here'
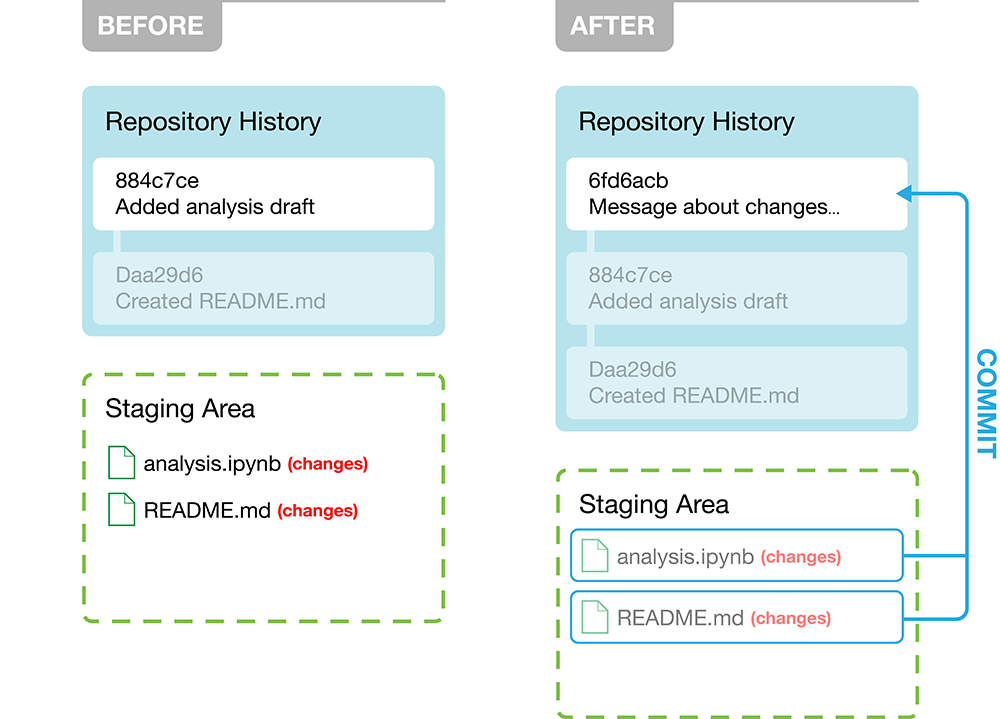
These changes are only committed locally.
Each commit is associated with a commit hash that Git automatically adds for you.
It is a SHA-1 hash which is a string of characters consisting of about 40 letters and numbers. The purpose of the hash is to serve as a unique identifier for the commit, and is used by Git to index project history. Git is able to work with shorter versions of hashes (e.g. 884c7ce).
Default editors
If you run git commit and forget to add a message, git will throw you into a text editor. Typically the default text editor is vim.
It’s good to know a few vim commands in case this happens.
When you are thrown into vim, at first you cannot insert or edit text (you are in vim “normal” mode, where you can only move around the file, save, exit etc.) What to do:
- Type
ito enter insert mode. Now you can add text - Type your commit message
- To exit insert mode, type
<ESC>(the escape key) - To exit
vim, run:wqthenRETURN
Exit commands
:wwrite (save) the file, do not quit:wqwrite (save) and quit:qquit (fails if there are unsaved changes):q!quit and throw away changes
Helpful resources: - vim guide - vim tutorial
Changing your default editor
Software carpentry has a nice guide for how to change your git config settings for a variety of editors.
Ignoring files
It can be convenient to use git add -A to stage all files in your repo for the next commit.
Problem: often there are unwanted files, such as large datasets, hidden system files (e.g. .DS_Store), or dependency chases (e.g. __pycache__).
Solution: Git has an easy way to specify which files to ignore, even when using git add -A. Files to ignore can be listed in a special file named .gitignore that is in the root of your repo (i.e. where your .git folder is).
You need to create your own .gitignore file and manually edit it:
- In VSCode, click on
File > New File > Text File - Save your new file as
.gitignore(NOT.gitignore.txt!)
GitHub provides templates of .gitignore files that you can copy and add to your own .gitignore file.
Here are some helpful file patterns for .gitigore files.
Suppose you already accidentally committed .DS_Store in a previous commit.
Now, you added a .gitignore file that lists .DS_Store.
The .gitignore file only prevents untracked files from being tracked.
Because Git is already tracking .DS_Store, we need to tell Git to stop tracking .DS_Store by running:
git rm --cached .DS_StoreNow, .gitignore will ensure it is not added again.
Where am I?
Current status
To check the status of our repo, we can run the command:
git statusThis will display
- files that have been changed since last commit but have not been staged (i.e.
modifiedfiles) - files to be committed (i.e.
stagedfiles)
Log
To see a history of our commits, run:
git log
# for a shorter summary
git log --oneline When you run git log, you will see the notation HEAD. HEAD is a special pointer that indicates what commit you are currently viewing or working with.
If git log display is too long, type q into the shell to quit.
Differences
To see differences between your modified files and the previous commit, run
git diffIf you have already staged your files, git diff will not display anything. In this case, run
git diff --stagedWe can inspect differences between different commits by running, for example:
git diff v0.1 HEADThis will display the difference between the v0.1 tagged commit, and the current commit (HEAD). You can also replace v0.1 and HEAD with shortened commit hashes.
git diff output look like?
Here is some example output from git diff:
diff --git a/some-work.py b/some-work.py
index 7e51906..9cd69b5 100644
--- a/some-work.py
+++ b/some-work.py
@@ -2,4 +2,5 @@ import numpy as np

 A = np.zeros((5, 2))
 B = np.ones(5)
-
+C = np.zeros(4)
+D = np.ones(3)
This is git meta data:
index 7e51906..9cd69b5 100644This is a legend that assigns different markers to different files:
--- a/some-work.py
+++ b/some-work.py
This is a chunk header with a summary of the changes between files:
@@ -2,4 +2,5 @@The unmarked lines are the same between files. The - marked lines show lines in file a that are different from b, and vice versa for +.
import numpy as np

 A = np.zeros((5, 2))
 B = np.ones(5)
-
+C = np.zeros(4)
+D = np.ones(3)
Moving around
If we make more commits, we can move back to the tagged commit by running:
git checkout v0.1All our files will now look like their versions at v0.1.
Shortcuts
Git also provides shortcuts to help identify commits.
Appending ^ refers to the direct parent of a commit, e.g.
HEAD^- this refers to the commit one before the current commitmain^- this refers to the commit one before the tip of themainbranchv0.1^- this refers to the commit one before the taggedv0.1commit
You can also specify the number of commits back via ~:
HEAD~2refers to the commit 2 commits beforeHEAD
We initialize a repo, create a file
some-work.pyand commit this file with the message “C0”.cd path/to/git-example git init # create some-work.py git add some-work.py git commit -m "C0"
9e70eb7is the shortened hash of the commitmainis the name of the current branchHEAD -> mainmeans that HEAD is pointing to the main branch
We assign tag
v0.1to our current commit.git tag v0.1Next, we make a change to
some-work.pyand commit the change with message “C1”.# change some-work.py git add some-work.py git commit -m "C1"
We can see the tag
v0.1for “C0”, and thatHEAD -> mainis now at “C1”.We can look at our previous commit “C0”.
git checkout v0.1Now if we run
git logwe cannot see the “future” commit “C1”. To visualize the entire commit history, we can run:git log --all --graph --oneline --decorate
If we open
some-work.py, we can see it has reverted to its “C0” version.We can then go back to
main.git checkout mainIf we open
some-work.pyagain, it has reverted back to the “C1” version.To quickly look at the difference between
v0.1andHEAD, we can rungit diff v0.1 HEAD
Branches
By default, we are on the main branch.
We can create new branches to try out new features or fix bugs, without affecting main.
Creating a new branch
We can create a new branch named feature by running
git branch featureImportant: this does not switch us to the new feature branch. To switch from main to the feature branch, we run
git checkout featureShortcut: to create a new branch AND switch to that branch, you can run the command
git checkout -b featureMerging a branch
Suppose we did some work and committed it to the feature branch. We are happy with it, and want main to have these changes. We switch back to main and we merge feature into main:
git checkout main
git merge featureA merge is called a fast-forward merge if the current branch can simply be moved to the target branch’s commit. For example:
- You have a branch called
featurethat was created from a commit onmain - You have made commits to
feature - Meanwhile, the
mainbranch hasn’t received any new commits - When you merge
featureback intomain, Git simply moves themainpointer to match thefeaturepointer (it doesn’t create a new commit for the merge)
Live coding; see slides on Canvas.
Merge conflicts
Sometimes when we run git merge we have a merge conflict - we get the output:
CONFLICT (content): Merge conflict in some-work.py
Automatic merge failed; fix conflicts and then commit the result.
To fix the merge conflict, we manually go into the specified file i.e. some-work.py
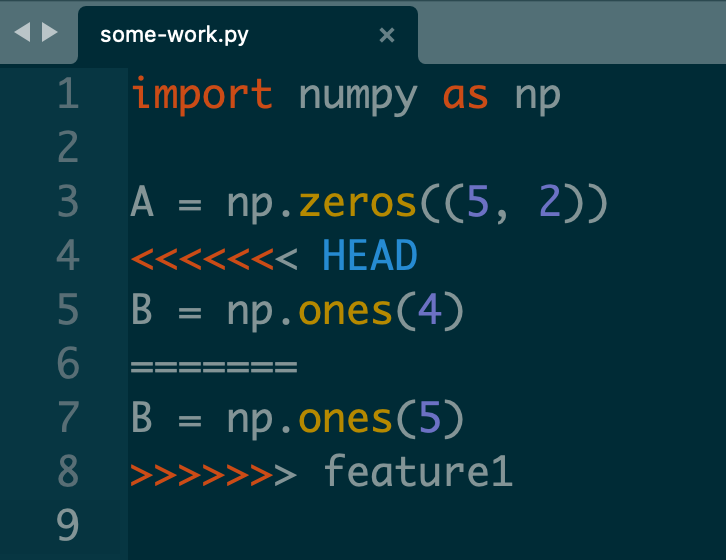
We see there are some new characters <, = and >.
- Everything between
<<<<<<< HEADand=======are lines inHEADthat are different fromfeature1. - Everything between
=======and>>>>>>> feature1are lines infeature1that are different fromHEAD.
To fix the merge conflict, we delete the line we want to discard, as well as <<<<<<< HEAD, ======= and >>>>>>> feature1.

We then stage and commit the file.
git add some-work.py
git commit -m 'fixed conflict'
More details
Undoing changes
Remove a file from the staging area
Suppose I have made changes to some-work.py and I have staged these changes (git add some-work.py).
I decide I want to remove some-work.py from the staging area.
I can run:
git restore --staged some-work.pyThis removes some-work.py from the staging area (the file itself is unchanged, however).
Restoring files to a previous commit
Suppose I have made changes to some-work.py (unstaged and uncommitted). I want to discard these changes and revert some-work.py to what it looked like at the previous commit.
I can run:
git restore some-work.pyNow, some-work.py looks like it did after the previous commit.
Amending a previous commit
Suppose your Git history looks like:
C0 -- C1 -- C2You make a change to the file some-work.py and then stage and commit:
C0 -- C1 -- C2 -- C3You realize there is a small typo. Instead of making a whole new commit, you can amend your previous commit, C3. To do so:
Edit the typo in
some-work.pyStage changes and amend the commit
git add some-work.py
git commit --amend --no-edit
The argument --no-edit means you do not change the original commit message. If instead you want to change the message, run git commit --amend -m 'new message'.
Your Git history still looks like:
C0 -- C1 -- C2 -- C3Amending creates a new commit with a new hash, effectively replacing the old one.
Do NOT amend commits that have already been pushed to a shared repository.
Resetting
The command git reset moves HEAD and the current branch back to a previous commit. This effectively deletes commits.
Suppose our Git history is
C0 -- C1 -- C2 -- C3We want to ‘delete’ commit C3.
There are a few options, depending on whether you want to keep current working directory changes.
Hard reset
git reset --hard HEAD^This undoes
C3completely. It makes your files match exactly what they were atC2- you lose any changes in the working directory.Mixed reset
git reset --mixed HEAD^
git reset HEAD^ # this is the same as --mixed
This undoes
C3. Your working directory files stay the same - they are now unstaged modifications.Soft reset
git reset --soft HEAD^This undoes
C3. Your working directory files stay the same. It essentially goes back to the moment right before theC3commit - the staged changes are restored.
For all options, the Git history is now
C0 -- C1 -- C2If you need to go back further, you can use HEAD~n to go back n commits.
GitHub Authentication
When we interact with our remote repository on GitHub, we need to provide credentials for authentication. This proves we are a specific GitHub user, who’s allowed to do whatever we’re asking to do.
You cannot use the password that you use to login to GitHub’s website. (This was possible in the past, but not anymore (GitHub announcement).)
Instead, Git can communicate with a remote server using one of two protocols, HTTPS or SSH, and the different protocols use different credentials. To start with, we recommend HTTPS.
With HTTPS, we use a personal access token (PAT).
To generate a PAT, go to https://github.com/settings/tokens and click “Generate token”. When creating your PAT, remember to check the “repo” checkbox, and any other desired checkboxes.
When you use an HTTPS connection and are prompted for a password, use this PAT.
More details:
From Happy Git with R:
SSH keys provide a more secure way of logging into a server than using a password alone. While a password can eventually be cracked with a brute force attack, SSH keys are nearly impossible to decipher by brute force alone.
Generating a key pair provides you with two long strings of characters: a public and a private key. You can place the public key on any server (like GitHub!), and then unlock it by connecting to it with a client that already has the private key (your computer!). When the two match up, the system unlocks without the need for a password. You can increase security even more by protecting the private key with a passphrase.
High level overview of set up
On your local computer:
- Create a public-private SSH key pair. Optionally, encrypt the private key with a passphrase (best practice).
- Add the private key to your ssh-agent. If you protected it with a passphrase, you may have additional configuration.
On GitHub.com:
Setting up remote repositories
In this section, we discuss how to set up remote repositories. We consider a number of scenarios:
- Existing local, new remote: locally, we have an existing repo and we want to create a remote to track our local repo
- New local, new remote: we are starting a new project and want to create both local and remote repos
- New local, existing remote: we want to create a local repo from an existing remote repo (e.g. a remote created by your collaborator)
Here are the steps to create a remote repo on GitHub and link it to our existing repo.
Log in to GitHub
Near “Top Repositories”, click the green “New” button. Or, if you are on your profile page, click “Repositories”, then the green “New” button.
Fill in repo set up info:
- Repository template: No template.
- Repository name:
myrepoor whatever you wish to name your project. Approach this similar to a variable name, in code: descriptive but brief, no whitespace. Letters, digits, -, ., or _ are allowed. - Description: “Analysis of the stuff” or any short description of the project.
- Private.
- Do not initialize with a
READMEor.gitignorefile
Click the big green button that says “Create repository”.
Click
<>Code(if not already there.)Copy the URL to your clipboard. Choose HTTPS or SSH:

On your local computer, open Terminal (or other shell) and navigate to your local repo (
cd path/myrepo).We store the remote URL in the local repo Git settings and name the remote repo as
origin. This is accomplished by running the command in Terminal, inputting the copied URL:git remote add origin <URL>So far, the GitHub repo does not have the files or changes in the local repo. Use the command
git push <remote> <branch>to push your local changes to the<branch>branch on the<remote>remote. For example:git push origin mainAbove,
originis the remote name andmainis the branch oforiginthat we are pushing to.Confirm the local files propogated to the GitHub remote by going to the web browser and refreshing your repo on GitHub.
We first create a remote repo on GitHub. Locally, we then clone this remote repo.
- Create a new remote repo following steps 1-6 in Existing local, new remote EXCEPT initialize your repo with a
README.mdfile. - On your local computer, open Terminal (or other shell) and navigate to where you want your local repo to be located.
- Run
git clone <URL>where URL is copied from step 6. This will create a new folder,myrepo, on your local computer.
The git clone command automatically stores the remote repo URL in your local git settings. The remote URL is stored under the name origin. To check this, you can see what remotes are stored and their names by running git remote --verbose (or git remote -v for short).
Locally, we clone the existing remote repo.
- On GitHub, go to the remote repo
collab-repo. Click the green “<>Code” button and copy the HTTPS or SSH URL. - On your local computer, open Terminal (or other shell) and navigate to where you want your local repo to be located.
- Run
git clone <URL>where URL is copied from step 1. This will create a new folder,collab-repo, on your local computer.
When you accept a homework on Git Classroom, a new remote repo is created. To work on your homework locally, you clone the remote repo to your local computer and make commits. When you push your local changes to the remote, you are submitting your homework!
Working with remotes
Listing stored remotes
In your local repo, you can see what remotes have been stored:
git remote -vExample output:
origin  git@github.com:moran-teaching/hw1.git (fetch)
origin  git@github.com:moran-teaching/hw1.git (push)
Adding a new remote
In Existing local, new remote, we saw how to add a remote:
git remote add <remote-name> <URL>There is a strong convention to use origin as the name of your main remote. (Indeed, this is the default name when you clone a repo.)
A common reason to add a second remote is when you have done a “fork and clone” of a repo and your personal copy (your fork) is set up as the origin. You may want to pull changes from the original repository - it is common to use upstream as the name for this remote.
git remote add upstream https://github.com/TRUE_OWNER/REPO.git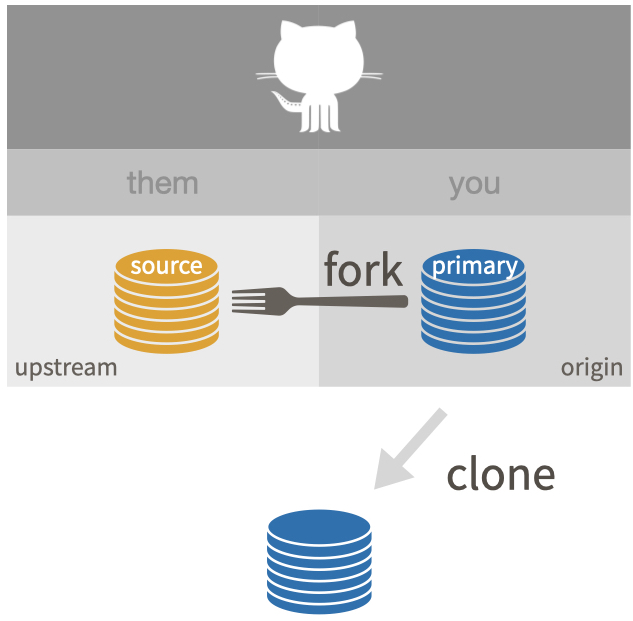
Renaming remotes
To rename a remote, use the command
git remote rename <old-name> <new-name>Fetching from a remote
To get new data from a remote use git fetch <remote_name>. This retrieves and stores the data locally, but importantly it does not change the state of your local files in any way. To incorporate the data into your repository, you need to merge or rebase your project with the remote project.
In our local repo:
# fetch data from origin remote
git fetch origin
# make sure we are in our local main branch
git checkout main
# Now merge it with origin main branch
git merge origin/main To specify the main branch of origin, we needed to use the syntax origin/main.
Pulling from a remote
A shortcut which combines fetching and merging is pulling:
git pull origin main # equivalent to fetch and merge in one stepSpecifically, the syntax is:
git pull <remote-name> <remote-branch>git push syntax
By default, changes from <remote-branch> are merged into the current local branch. To specify a different local branch, use:
git pull <remote-name> <remote-branch>:<local-branch>For example, to pull changes from origin/main and merge into local branch feature1:
git pull origin main:feature1Pushing to a remote
Use git push <remote> <remote-branch> to push your local changes to the <remote-branch> branch of <remote>.
# push my local changes to the origin remote's main branch
git push origin main
Setting upstreams
Push local main to origin main and have local main track origin main:
git push --set-upstream origin main
# shorter form
git push -u origin main
# you only need to set upstream tracking once!
Then in your local main branch, you can use git push.
More details
Common Issues
Dealing with push rejections
Problem: you want to push changes to GitHub but you are rejected:
git pushOutput:
To https://github.com/YOU/REPO.git
 ! [rejected]        main -> main (fetch first)
error: failed to push some refs to 'https://github.com/YOU/REPO.git'
hint: Updates were rejected because the remote contains work that you do
hint: not have locally. This is usually caused by another repository pushing
hint: to the same ref. You may want to first integrate the remote changes
hint: (e.g., 'git pull ...') before pushing again.
hint: See the 'Note about fast-forwards' in 'git push --help' for details.
This means that your local Git history and that on the GitHub remote are not compatible, i.e. they have diverged.
In the abstract, this is the state on GitHub:
A -- B -- C (on GitHub)And this is your local state:
A -- B -- D (what you have)You can’t cause some sort of merge to happen to the GitHub copy when you push.
Instead, you’ve have to pull the commit C and somehow integrate it into your D-containing history (next section). Then you will be able to push again.
Pulling but you have local changes
Problem: You want to pull changes from upstream, but you have done some new work locally since the last time you pulled.
Suppose we have:
History of origin/main (on GitHub)
A -- B -- C History of your local main branch
A -- B -- D Pull (fetch and merge)
The simplest option is to fetch the commits from origin/main and merge them, which is what git pull does.
- No conflicts
If there are no merge conflicts with C and D, you can run git pull.
$ git pull

< YOU WILL PROBABLY BE KICKED INTO AN EDITOR HERE RE: MERGE COMMIT MESSAGE! >

Merge made by the 'recursive' strategy.
 README.md | 4 ++--
1 file changed, 2 insertions(+), 2 deletions(-)- Merge conflicts
If there are merge conflicts, you will see something like:
$ git pull
Auto-merging foo.py
CONFLICT (content): Merge conflict in foo.py
Automatic merge failed; fix conflicts and then commit the result.
Similarly to merging conflicts, you need to manually edit foo.py. Then:
git add foo.py
git commit -m 'merged branch main from remote'
Accidentally committing a large file
AVOID COMMITTING LARGE FILES. Even if you remove large files in a later commit, they will stay in your Git history, causing trouble.
Best practices:
- In your repo, create a
datfolder and store all your datasets there. - Add
dat/to your.gitignorefile.
What if you already committed it?
Local only
Find the commit where your file was first added. Use git reset --soft <commit-hash> to go back to that commit. Remove the large file from your staging area git restore --staged <file>. Then commit. Add your file name to your .gitignore so you don’t do this again.
Local and remote
See the GitHub documentation. Here is a shorter version:
Download git-repo-filter. You can do so easily by running
pip install git-repo-filterCreate a clone of your repo
In your cloned repo, run
git filter-repo --path path/to/large_file --invert-pathsForce push these changes to the remote
git push --force --mirror origin
Use this force pushing with caution because it will overwrite the remote repo completely. It will delete branches on the remote that don’t exist locally. It affects all collaborators working with the repo.
Collaboration
Adding collaborators
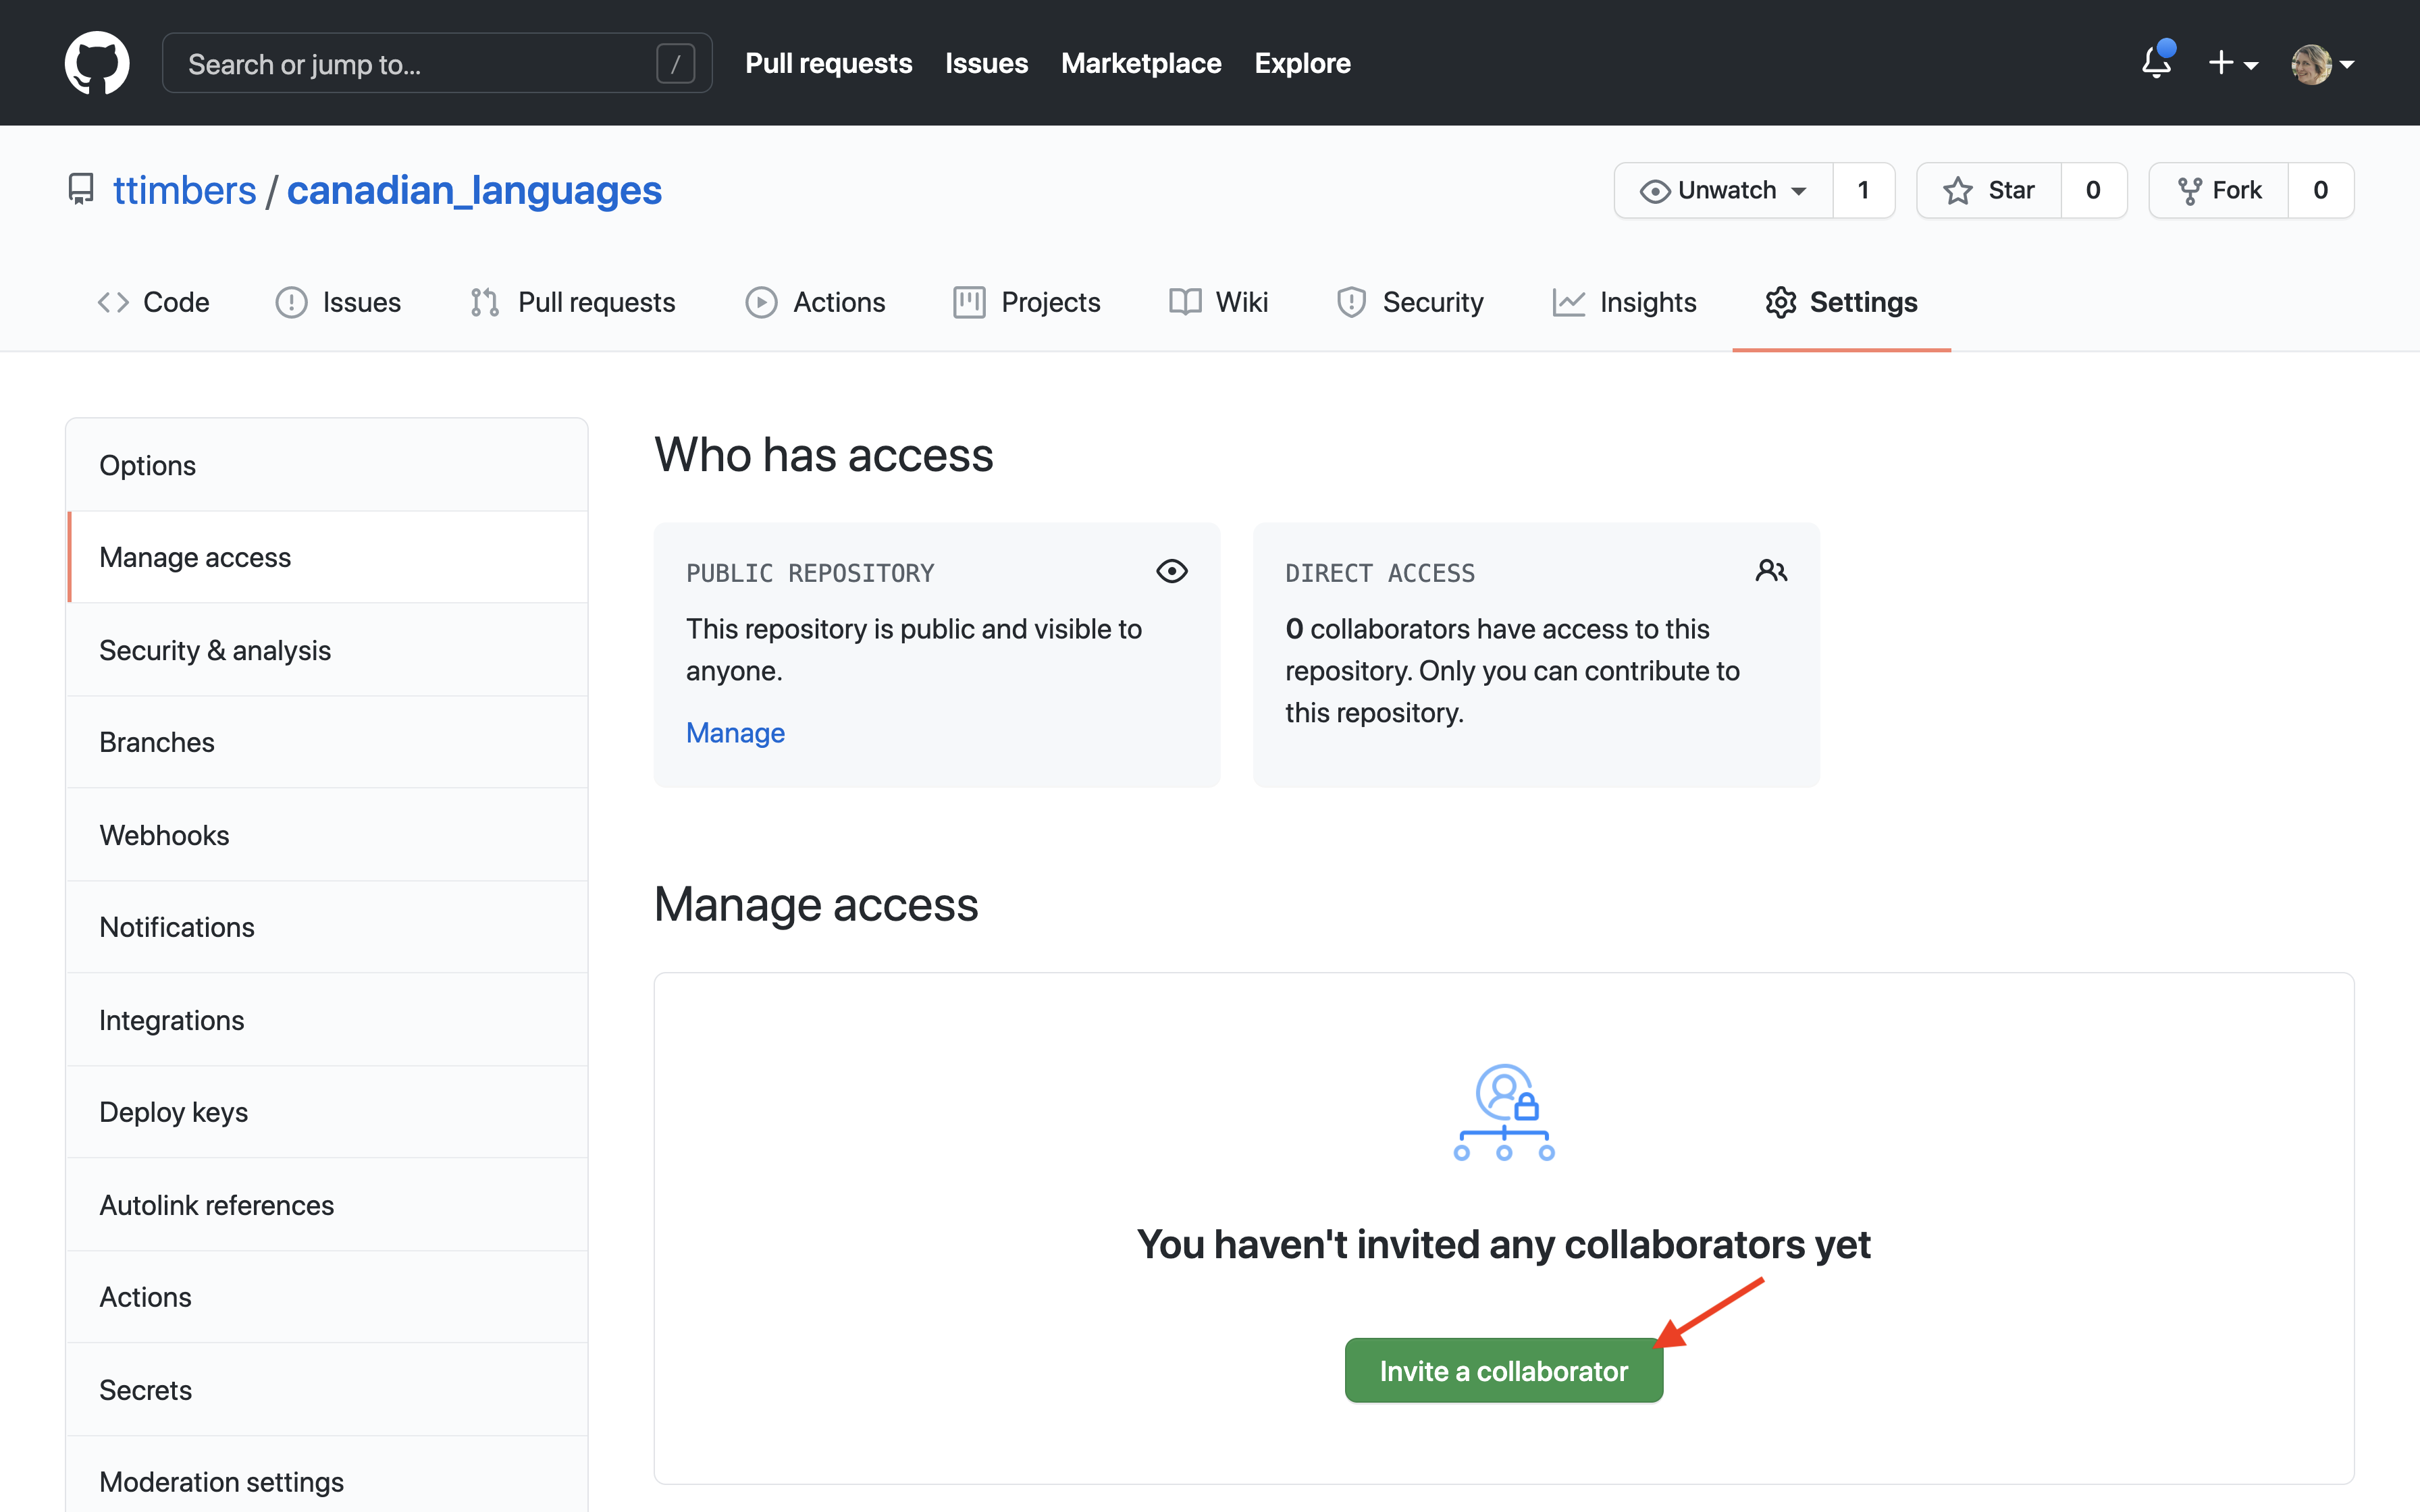
To give collaborators access to your repo:
- Go to GitHub and open your repo page.
- Navigate to the “Settings” tab.
- Click “Manage access”.
- Click the green “Invite a collaborator” button.
- Type in the collaborators GitHub username or email and select their name.
- Click the green “Add
to this repository”.
Collaboration workflows
Suppose a central GitHub repository contains the latest company-wide release (the main branch).
Developers have their own repository on their laptops, with some shared history with the central repo.
A developer wants to incorporate her changes to the GitHub remote repo.
Example 1
The developer makes sure she is on her local
mainbranch and then she merges changes from the remotemainbranch:git checkout main git pull origin mainNow, she has merged the remote
maininto her localmainbranch.The developer makes some changes.
The developer pushes her local
mainbranch (with her modifications) back to the central repository:git push origin main
Example 2
The developer pushes her local branch
mainto the central repository in a specific branch (e.g.feature5)git push origin main:feature5The developer opens a pull request on GitHub to propose merging
feature5with themainGitHub branch.Company developers discuss the pull request.
After everyone agrees,
feature5is merged onto the GitHubmainbranch.
Practicing pull requests
Here is a nice tutorial to practice with pull requests: First Contributions
Comic relief
Git is hard!

Also, the Git documentation is famously hard to parse - here is a parody of Git documentation: git-man-page-generator
Resources
- GitHub cheat sheet
- Some common Git issues and how to resolve: Dangit, Git!
- Interactive git learning
- Software carpentry tutorial