Lecture 0 - Getting started with Python and Git
Anaconda Installation
We will use Python via the Anaconda distribution.
Download Anaconda here.
There are a variety of different Python distributions; for statistics and machine learning, we recommend Anaconda as it comes with many useful packages pre-installed.
(It is also a good idea NOT to use your computer’s pre-installed Python - you don’t want to accidentally change any system settings!)
Anaconda requires a few GBs of storage - a more lightweight version is Miniconda, which you can download here.
Managing packages
There are many open source Python packages for statistics and machine learning.
To download packages, two popular package managers are pip and conda. Both pip and conda come with the Anaconda distribution. Instructions for how to install packages using conda can be found in this section.
Environments
About
It is good coding practice to use virtual environments with Python. From this blog:
A Python virtual environment consists of two essential components: the Python interpreter that the virtual environment runs on and a folder containing third-party libraries installed in the virtual environment. These virtual environments are isolated from the other virtual environments, which means any changes on dependencies installed in a virtual environment don’t affect the dependencies of the other virtual environments or the system-wide libraries. Thus, we can create multiple virtual environments with different Python versions, plus different libraries or the same libraries in different versions.

Creating an environment for MSDS-597
We recommend creating a virtual environment for your MSDS-597 coding projects. This way, you can have an environment with all the necessary packages and you can easily keep track of what versions of the packages you used.
- Open Terminal (macOS) or a shell
- Create an environment called
msds597usingcondawith the command:conda create --name msds597 - To install packages in your environment, first activate your environment:
conda activate msds597 - Then, install the following packages using the command:
conda install numpy pandas scikit-learn matplotlib seaborn jupyter ipykernel - To exit your environment:
conda deactivate
Here is a helpful cheatsheet for conda environment commands.
For more details about the shell / bash, here is a helpful resource.
VSCode
There are a number of Python IDEs (integrated development environments). In class, we will be using VSCode (download here).
- Download
lecture-1.ipynbfrom Canvas and open it in VSCode. - To use your
msds597environment, on the top right hand corner, click “Select Kernel” > “Python Environments” > msds597. If it prompts you to installipykernel, follow the prompts to install it.
Jupyter notebooks (.ipynb files) are useful to combine code cells with text (as markdown cells).
VSCode also has a Python interactive window (details here).
Git and GitHub
We will be using Git Classroom for homework submission.
Git is a Version Control System (VCS). It is a useful tool for easily tracking changes to your code, collaborating, and sharing. More specifically, Git manages the changes in a set of files – called a repository.
GitHub is a repository hosting service. It provides storage for Git-based projects on the internet. This allows collaborators to see your files, sync changes and make changes themselves.
Setting up
- If you do not have a GitHub account, create an account on https://github.com. (Advice on registering for GitHub and selecting a username here).
- Install git on your computer. If you have a Mac, it comes with XCode command line tools link. For Windows, you can download it here. Here are some more installation guides for different operating systems.
Git config
After installing Git, introduce yourself to Git! The following commands store your name and email in Git’s configuration settings.
On your local computer, in Terminal (or other shell), run:
git config --global user.name "Jane Doe"
git config --global user.email "jane@example.com"
substituting your name and the email associated with your GitHub account.
To see the current config settings, run git config --global --list.
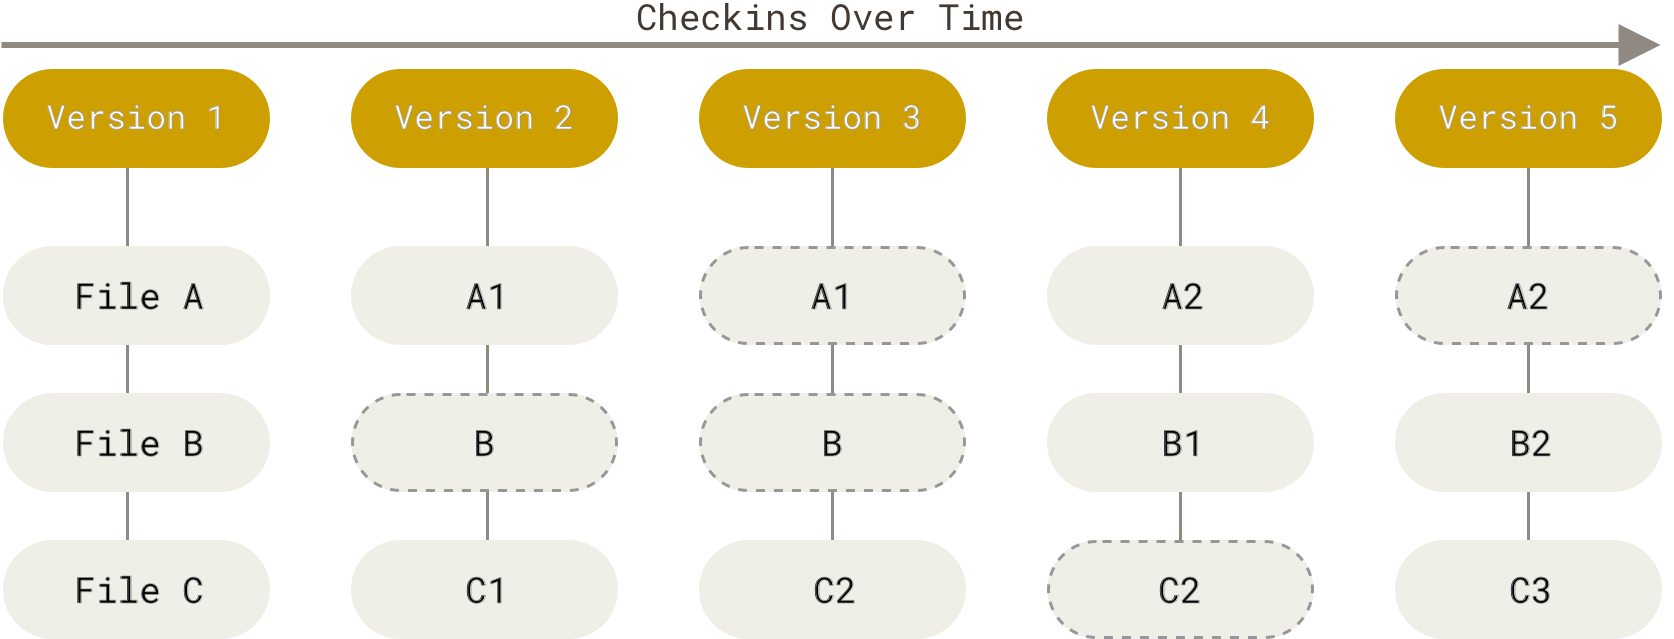
What does Git do?
Git stores snapshots of a repository over time.
The repository history is not automatically generated; Git must be explicitly told when to record a version of the project. These records are called commits. Commits contain a snapshot of the file contents as well metadata about the repository at that time the commit was created (who made the commit, when it was made, etc.).
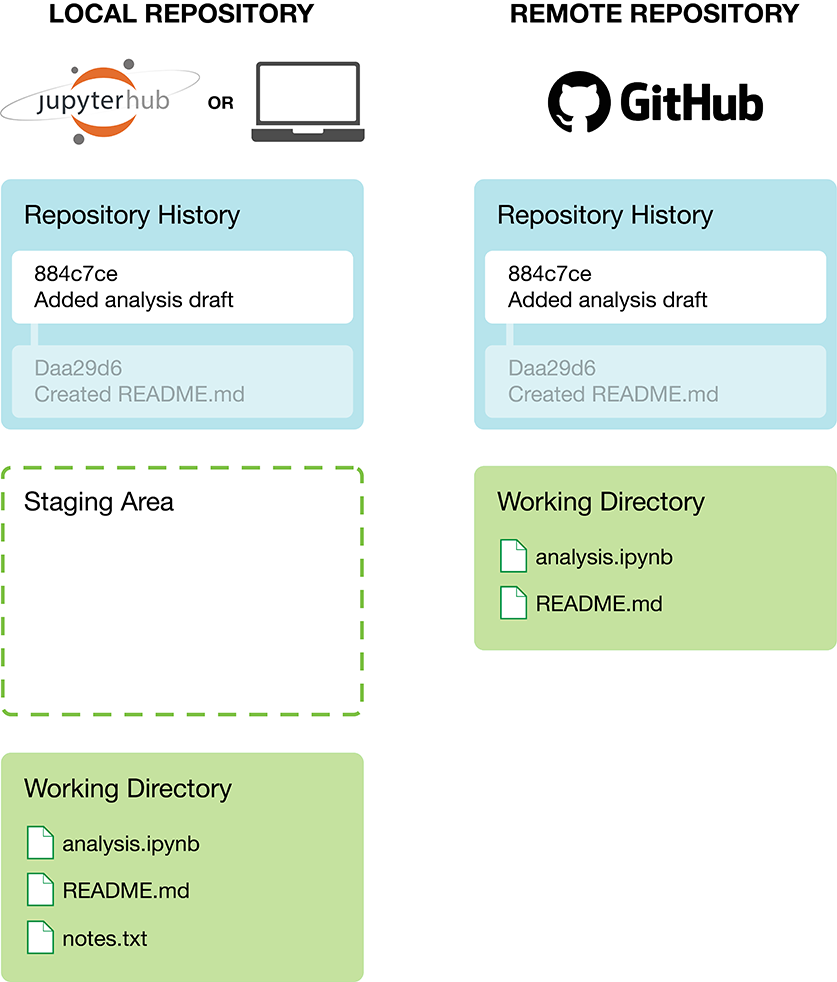
Local and remote repositories
Typically when we use version control, we create two copies of the repository.
Local repository: this is the repository, usually on our own computer, where we create, edit and delete files.
Remote repository: this repository is stored on a repository hosting service like GitHub - this is easily shareable with collaborators.
When working on files in your local repository and making changes, these changes will only exist locally. To update the remote repository, you need to explictly push your local commits to the remote repo. We will talk about how to push commits later.
Local Repo Workflow
In our local repo, our files are in three main states: modified, staged, and committed:
modifiedmeans that you have changed the file but have not committed it to your history yet.stagedmeans that you have marked a modified file in its current version to go into your next commit snapshot.committedmeans that the data is safely stored in your local history
The basic Git workflow goes something like this:
- You modify files.
- You selectively stage just those changes you want to be part of your next commit, which adds only those changes to the staging area.
- You do a commit, which takes the files as they are in the staging area and stores that snapshot permanently to your Git history.
GitHub Authentication
When we interact with our remote repository on GitHub, we need to provide credentials for authentication. This proves we are a specific GitHub user, who’s allowed to do whatever we’re asking to do.
You cannot use the password that you use to login to GitHub’s website. (This was possible in the past, but not anymore (GitHub announcement).)
Instead, Git can communicate with a remote server using one of two protocols, HTTPS or SSH, and the different protocols use different credentials. To start with, we recommend HTTPS.
With HTTPS, we use a personal access token (PAT).
To generate a PAT, go to https://github.com/settings/tokens and click “Generate token”. When creating your PAT, remember to check the “repo” checkbox, and any other desired checkboxes.
When you use an HTTPS connection and are prompted for a password, use this PAT.
More details:
From Happy Git with R:
SSH keys provide a more secure way of logging into a server than using a password alone. While a password can eventually be cracked with a brute force attack, SSH keys are nearly impossible to decipher by brute force alone.
Generating a key pair provides you with two long strings of characters: a public and a private key. You can place the public key on any server (like GitHub!), and then unlock it by connecting to it with a client that already has the private key (your computer!). When the two match up, the system unlocks without the need for a password. You can increase security even more by protecting the private key with a passphrase.
High level overview of set up
On your local computer:
- Create a public-private SSH key pair. Optionally, encrypt the private key with a passphrase (best practice).
- Add the private key to your ssh-agent. If you protected it with a passphrase, you may have additional configuration.
On GitHub.com:
Homeworks and Git
Prof Moran has created a starter homework to become familiar with homework submission.
Accept Homework-0 by clicking the following link (not assessed - this is to get familiar with Git) https://classroom.github.com/a/lhMUsxCX
Associate your GitHub account with your NetID on the MSDS-597 GitHub Classroom.
A new repository
moran-teaching/hw0-username(with username replaced with your GitHub username) will be createdCopy this repository to a folder on your computer using the following instructions.
Note: after git clone ... using the HTTPS link, you will be prompted for a password. This is your Personal Access Token (PAT) that you created above.
In your local
hw0-usernamefolder, create a new markdown file calledhw0.mdand add some text (e.g. “I have read the github intro.”). You can edit markdown files using VSCode, or other text editors of your choice (here are some resources for markdown in VSCode).We are now at the
modifiedstep of the git workflow. To add files to thestagingstep, navigate tohw0-usernamein Terminal. Then, run:git add hw0.mdorgit add -A
git add hw0.mdadds only thehw0.mdfile while-Ais an option that adds all files to the staging step.To commit these changes, run:
git commit -m "added hw0.md"The option
-mstands for message - every commit needs a message (here, the message is “added hw0.md”). It is helpful to write descriptive messages so you know what each commit (snapshot) contains.
- Now, there is a commit (snapshot) of your changes locally. To submit your assignment, you need to push your changes to GitHub. To do this, run:
git push origin mainIn terms of syntax, the command is
git push <remote> <branch>, where remote is the server and branch is the branch you want to update.originis the default name Git gives to the server you cloned from.mainis the main branch (we will talk about branches later).
Resources
Git:
- See more visualizations and explanations here.
- Here is a nice intro to git.