import duckdb
duckdb.sql("""
COPY (SELECT * FROM '../data/rates.csv') TO '../data/rates.parquet' (FORMAT 'parquet');
""")Lecture 13 - Best Practices
Overview
In this lecture, we cover a number of best practices and tips for your projects. These include:
- How to share
condaandpipenvironment information - Refactoring code to scripts
argparseto pass arguments via command line
- Testing code
- Data formatting conversions
- Storytelling with data
- Data alone isn’t the ground truth
Environments
Conda
We have been working with our msds-597 conda environment.
To ensure others can reproduce our code using the same packages (and package versions), we can provide an environment.yml file.
We can generate a environment.yml file by running:
Terminal
conda env export > environment.ymlThen, someone can create a conda environment with all the same packages (and versions) using:
Terminal
conda env create -f environment.ymlNote: The first line of the yml file sets the new environment’s name. Change the yml file manually to change environment name.
The packages installed via pip are listed under pip in the environment.yml file.
From history
You can obtain a more “minimal” yml file using:
Terminal
conda env export --from-history > environment.ymlNote however that the packages installed via pip will not be included.
Conda vs. Pip
We haven’t talked much about the differences between conda and pip.
Conda is a general-purpose package management system, designed to build and manage software of any type from any language. This means conda can take advantage of many non-python packages (like BLAS, for linear algebra operations).
Pip is a package manager for python. You may see people using pip with environments using virtualenv or venv.
My preference (as we’ve seen in the class) is to use a conda environment, use conda to install base packages such as pandas and numpy, and use pip within my conda environment to install packages not available via conda.
See here for some conda vs pip misconceptions, and why conda is helpful.
Pip Requirements
To get only the packages installed via pip, you can use the command:
Terminal
pip list --format=freeze > requirements.txtThen, if someone wants to install the same pip packages, with their environment active, they can run:
Terminal
pip install -r requirements.txtRefactoring notebooks to scripts
It is good practice to refactor notebooks to Python scripts and document our code. For example, here is clean_gapminder.py, a refactored script of our Lecture 4 code which cleans the Gapminder data.
This script assumes that our directory structure is:
project/
├── data/
│   ├── gdp_pcap.xlsx
│   ├── lex.xlsx
│   └── pop.xlsx
├── src/
|   ├── clean_gapminder.py
|   └── test_gapminder.py
└── log/
We can run this script from the command line while in the src directory.
Terminal
python clean_gapminder.pyThis script will create a new file gapminder_clean.csv. By default, this csv will be saved in the data directory.
Modules
A module is a file containing Python definitions and statements (docs). The file name is the module name with the suffix .py appended.
For instance, suppose you have a file called fibo.py in the current directory with the following contents:
fibo.py
# Fibonacci numbers module

def fib(n):    # write Fibonacci series up to n
    a, b = 0, 1
    while a < n:
        print(a, end=' ')
        a, b = b, a+b
    print()
In a Python interpreter, you can import this module with the following command:
import fiboThis does not add the name of the function defined in fibo directly to the current namespace; it only adds the module name fibo there. Using the module name you can access the functions:
fibo.fib(5)Script format
In clean_gapminder.py, we have the functions:
main: Main function which runs when module is called directlyload_tidy_merge: Loads data, converts data to tidy format and merges into one pd.DataFramefilter_between_years: Keeps rows of a pd.DataFrame between start year and end yearformat_numbers: Changes string numbers e.g. ‘10M’ to floats for columns [‘gdp’, ‘pop’], converts ‘pop’ and ‘year’ to int64get_continents: Creates DataFrame with new ‘continent’ column using pycountry module
The end of the script has a code block that begins with
if __name__ == "__main__":

    # code here
In Python, if __name__ == "__main__" is boilerplate code. It ensures that code within the if statement only runs if the script (or “module”) is executed in the top-level code environment.
What is the top-level code environment? “Top-level code” is the first user-specified Python module that starts running. It’s “top-level” because it imports all other modules that the program needs.
__name__is a built-in variable which evaluates to the name of the current module.- a file run directly from the command line has
__name__set to__main__ - if a file is being imported from another module, that file’s
__name__will be set to that module’s name
- a file run directly from the command line has
Most often, there is also a function named main that encapsulates the module’s primary behavior.
Example of
__name__
Example comes from here.
Suppose we have two modules:
file1.py
print ("file1 __name__ = %s" %__name__)

if __name__ == "__main__":
    print ("file1 is being run directly")
else:
    print ("file1 is being imported")
file2.py
import file1

print ("file2 __name__ = %s" %__name__)

if __name__ == "__main__":
    print ("file2 is being run directly")
else:
    print ("file2 is being imported")
In the command line, if we run:
Terminal
python file1Our output will be:
File1 __name__ = __main__
File1 is being run directly
In contrast, if we run
Terminal
python file2Our output will be:
File1 __name__ = File1
File1 is being imported
File2 __name__ = __main__
File2 is being run directly
Omitting if __name__ == "__main__" guard
If we didn’t have the guard in clean_gapminder.py, then when we call import clean_gapminder.py in, for example, test_gapminder.py, the code in clean_gapminder.py will be run. This is problematic as we don’t want to re-run our data cleaning when we call test_gapminder.py. Another issue is we could create a new variable that overwrites something in our called script.
See more details in the docs.
argparse
Let’s look more closely at our code that is run when clean_gapminder.py is called:
if __name__ == "__main__":

    parser = argparse.ArgumentParser(description='Clean Gapminder data')

    parser.add_argument('--data', type=str, default='../data/',
                        help='path to data folder')
    parser.add_argument('--log', type=str, default="../log/",
                        help='path to log folder')

    args = parser.parse_args()

    main(args)
We have created parser, an instance of argparse.ArgumentParser. This allows us to specify arguments for our function directly using the command line.
We can add arguments using ArgumentParser.add_argument(). This is a method which attaches individual argument specifications to the parser.
Consider the following.
parser.add_argument('--data', type=str, default='../data/',
                        help='path to data folder')
We have added the optional argument data, which should be of type str. This argument is the directory where gapminder_clean.csv will be saved, relative to the location of clean_gapminder.py.
Then, the following
args = parser.parse_args()parses arguments specified in the command line. We can access these arguments using args.data and args.log.
Documenting our code
“In every project you have at least one other collaborator; future-you. You don’t want future-you to curse past-you.” Hadley Wickham
Documenting our code is good practice, both for our collaborators, and ourselves.
Documenting your Python code is all centered on docstrings. These are built-in strings that, when configured correctly, can help your users and yourself with your project’s documentation.
Docstrings use the triple-double quote (""") string format.
For scripts, docstrings are placed at the top of the file and should be documented well enough for users to be able to have a sufficient understanding of how to use the script.
For functions, docstrings are placed directly below the function definition.
Some common formatting guidelines for docstrings:
Using pydoc
The pydoc module automatically generates documentation from Python modules.
Terminal
python -m pydoc clean_gapminderGetting argparse documentation
The help arguments that we added to our argparse.add_argument calls can be seen by running:
Terminal
python clean_gapminder.py --helpTesting our script
We have added exception handling, tests and logging to our script.
Exception handling
Errors detected during execution are called exceptions. The Python docs has a list of built-in exception types. Some examples:
AssertionError: whenassertstatement failsNotImplementedErrorSyntaxError
Exceptions can be handled using try...except statements:
- The
tryblock lets you test a block of code for errors. - The
exceptblock lets you handle the error.
In our clean_gapminder.py script, we have added some try...except statements to check our code.
for c in df_country['country']:
    try:
        df_country.loc[df_country['country']==c, 'country_code'] = pc.country_name_to_country_alpha2(c)
    except:
        warnings.warn(f"{c} not mapped to country code - no continent will be mapped")
        with open(log_path + 'country_exceptions.txt', 'w') as f:
            f.write(f"{c}\n")
Raising exceptions
We can also raise our own exceptions, as we saw in the homeworks, which included:
raise NotImplementedErrorAnother example:
Python
x = -1

if x < 0:
  raise Exception("Sorry, no numbers below zero")
Warnings
In our script, we also added a warning.
Warning messages are typically issued when it is useful to alert the user of some condition, where that condition doesn’t warrant raising an exception and terminating the program.
In clean_gapminder.py we issue a warning if there is a country name that doesn’t correspond to a country in pycountry. (In Lecture 4, we figured out what these countries are, and we have added them to our code).
import warnings
# more code here
warnings.warn(f"{c} not mapped to country code - no continent will be mapped")
These warnings could be helpful, for example, if we download new versions of the gapminder data from the website, and the new naming conventions of the gapminder files has changed. The warning lets us know we should go and check these country names.
Logging
If there are countries that can’t be mapped to a pycountry code, we log them in log/country_exceptions.txt. We use the function open with the option a for “append”. The append option creates a file if it doesn’t exist and allows us to add text without overwriting the file.
with open(log_path + 'country_exceptions.txt', 'a') as f:
            f.write(f"{c}\n")
Note: we use an f-string to write the current country to file.
Pytest
We have also created a file test_gapminder.py that contains tests using pytest (see here).
We have seen pytest before in the homeworks. Let’s go over pytest in some more detail.
Running pytest
We can run pytest from the command line.
To run pytest, you have the option to specify files and directories:
Terminal
pytest test_gapminder.pyIf you don’t specify any files or directories, pytest will look for tests in the current working directory and subdirectories. It looks for .py files starting with test_ or ending with _test:
Terminal
pytestYou can also run a specific test function from a file:
Terminal
pytest test_gapminder.py::test_format_numbersTest discovery
Pytest was able to find all the tests we wrote because we named them according to pytest conventions. Here are the naming conventions to make sure your tests are discoverable:
- Test files should be named
test_<something>.pyor<something>_test.py. - Test methods and functions should be named
test_<something>. - Test classes should be named
Test<Something>.
Generally, one test function (e.g. test_format_numbers) corresponds to one test. Later, we will see how to use parameterization to have one function yield multiple tests.
Test outcomes
Here are some possible pytest outcomes:
- PASSED (.)—The test ran successfully.
- FAILED (F)—The test did not run successfully.
- ERROR (E)—An exception happened before tests were run, often because of a syntax error or because an attempt to import a non-existent module.
Additional outcomes are possible if you add decorators to your tests:
- SKIPPED-Test was skipped
- XFAILED-Test failed as expected
- XPASS-Test passed unexpectedly (test was marked to fail)
Assert statements
Pytest can leverage assert statements. assert is a base (built-in) Python statement.
How it works:
Syntax: assert <condition>, <optional message> If <condition> is True, nothing happens. If <condition> is False, Python raises an AssertionError.
Python
assert 2 + 2 == 4  # Passes, nothing happens
assert 2 + 2 == 5  # Raises AssertionError
Pytest enhances assert by showing detailed failure info.
Parameterization
We can use @pytest.mark.parametrize to give multiple inputs to a test function. Each input corresponds to a separate test.
For example, we use @pytest.mark.parametrize as a decorator for the function test_number_to_float. This allows us to pass different values to test our function, each of the values corresponding to a different test. That is, the following will result in 6 tests.
@pytest.mark.parametrize("input_value, expected", [
    ("10k", 10000.0),
    ("1.5M", 1500000.0),
    ("2B", 2000000000.0),
    (1000, 1000),
    ("500", 500),
    ('test', None)
])
def test_number_to_float(input_value, expected):
    if isinstance(expected, float):
        assert number_to_float(input_value) == pytest.approx(expected)
    else:
        assert number_to_float(input_value) == expected
Data sharing
This is a nice guide to data sharing from Jeff Leek: https://github.com/jtleek/datasharing
Some take aways from the guide:
To facilitate efficient and timely analysis you should provide to a data scientist / statistician:
- The raw data.
- A tidy data set
- A code book describing each variable and its values in the tidy data set.
- An explicit and exact recipe you used to go from 1 -> 2,3
Raw data
It is critical that you include the rawest form of the data that you have access to. This ensures that data provenance can be maintained throughout the workflow. Here are some examples of the raw form of data:
- The strange binary file your measurement machine spits out
- The complicated JSON data you got from scraping an API
Tidy data
We discussed tidy data in Lecture 3 - the general principles are laid out by Hadley Wickham in this paper. While the paper describes tidy data using R, the principles are more generally applicable:
- Each variable you measure should be in one column
- Each different observation of that variable should be in a different row
- There should be one table for each “kind” of variable
- If you have multiple tables, they should include a column in the table that allows them to be joined or merged
When you put variables into a spreadsheet there are several main categories you will run into depending on their data type:
- Continuous
- Ordinal
- Categorical
- Missing
In general, try to avoid coding categorical or ordinal variables as numbers. For example, when you enter the value for sex in the tidy data, it should be “male” or “female”. The ordinal values in the data set should be “poor”, “fair”, and “good” not 1, 2 ,3. This will avoid potential mixups about which direction effects go and will help identify coding errors.
Converting data formats
Pandas
Pandas has several functions to help you convert data:
- CSV to Parquet:
import pandas as pd

df = pd.read_csv('data.csv')
df.to_parquet('data.parquet')- Parquet to CSV:
df = pd.read_parquet('data.parquet')
df.to_csv('data.csv', index=False)- CSV to SQLite:
import pandas as pd
import sqlite3

df = pd.read_csv('data.csv')
conn = sqlite3.connect('data.db')
df.to_sql('table_name', conn, if_exists='replace', index=False)
conn.close()- SQLite to CSV:
conn = sqlite3.connect('data.db')
df = pd.read_sql_query('SELECT * FROM table_name', conn)
df.to_csv('data.csv', index=False)
conn.close()
DuckDB
With DuckDB, you can convert files without loading into memory.
- CSV to Parquet
- CSV to SQLite
duckdb.sql("""
            ATTACH '../data/rates.db' as sqlite_db (TYPE SQLITE);
            CREATE TABLE sqlite_db.rates AS SELECT * FROM '../data/rates.csv';
""")
SQLite
You can also use SQLite in the command line to convert .csv to .sqlite or .db files.
The following command initializes rates.db, changes the mode to csv and imports rates.csv as a table called rates into rates.db.
Terminal
sqlite3 rates.db
.mode csv
.import rates.csv rates
Storytelling with data
From Storytelling with Data: A Data Visualization Guide for Business Professionals by Cole Nussbaumer Knaflic:
- Understand the context
- Choose an appropriate display
- Eliminate clutter
- Draw attention where you want it
- Think like a designer
- Tell a story
Data alone isn’t ground truth
This section is drawn from Angela Bassa’s post Data Alone Isn’t Ground Truth.
We can’t always trust empirical measures at face value:
- data is biased
- measurements contain errors
- systems have confounders
- people make assumptions
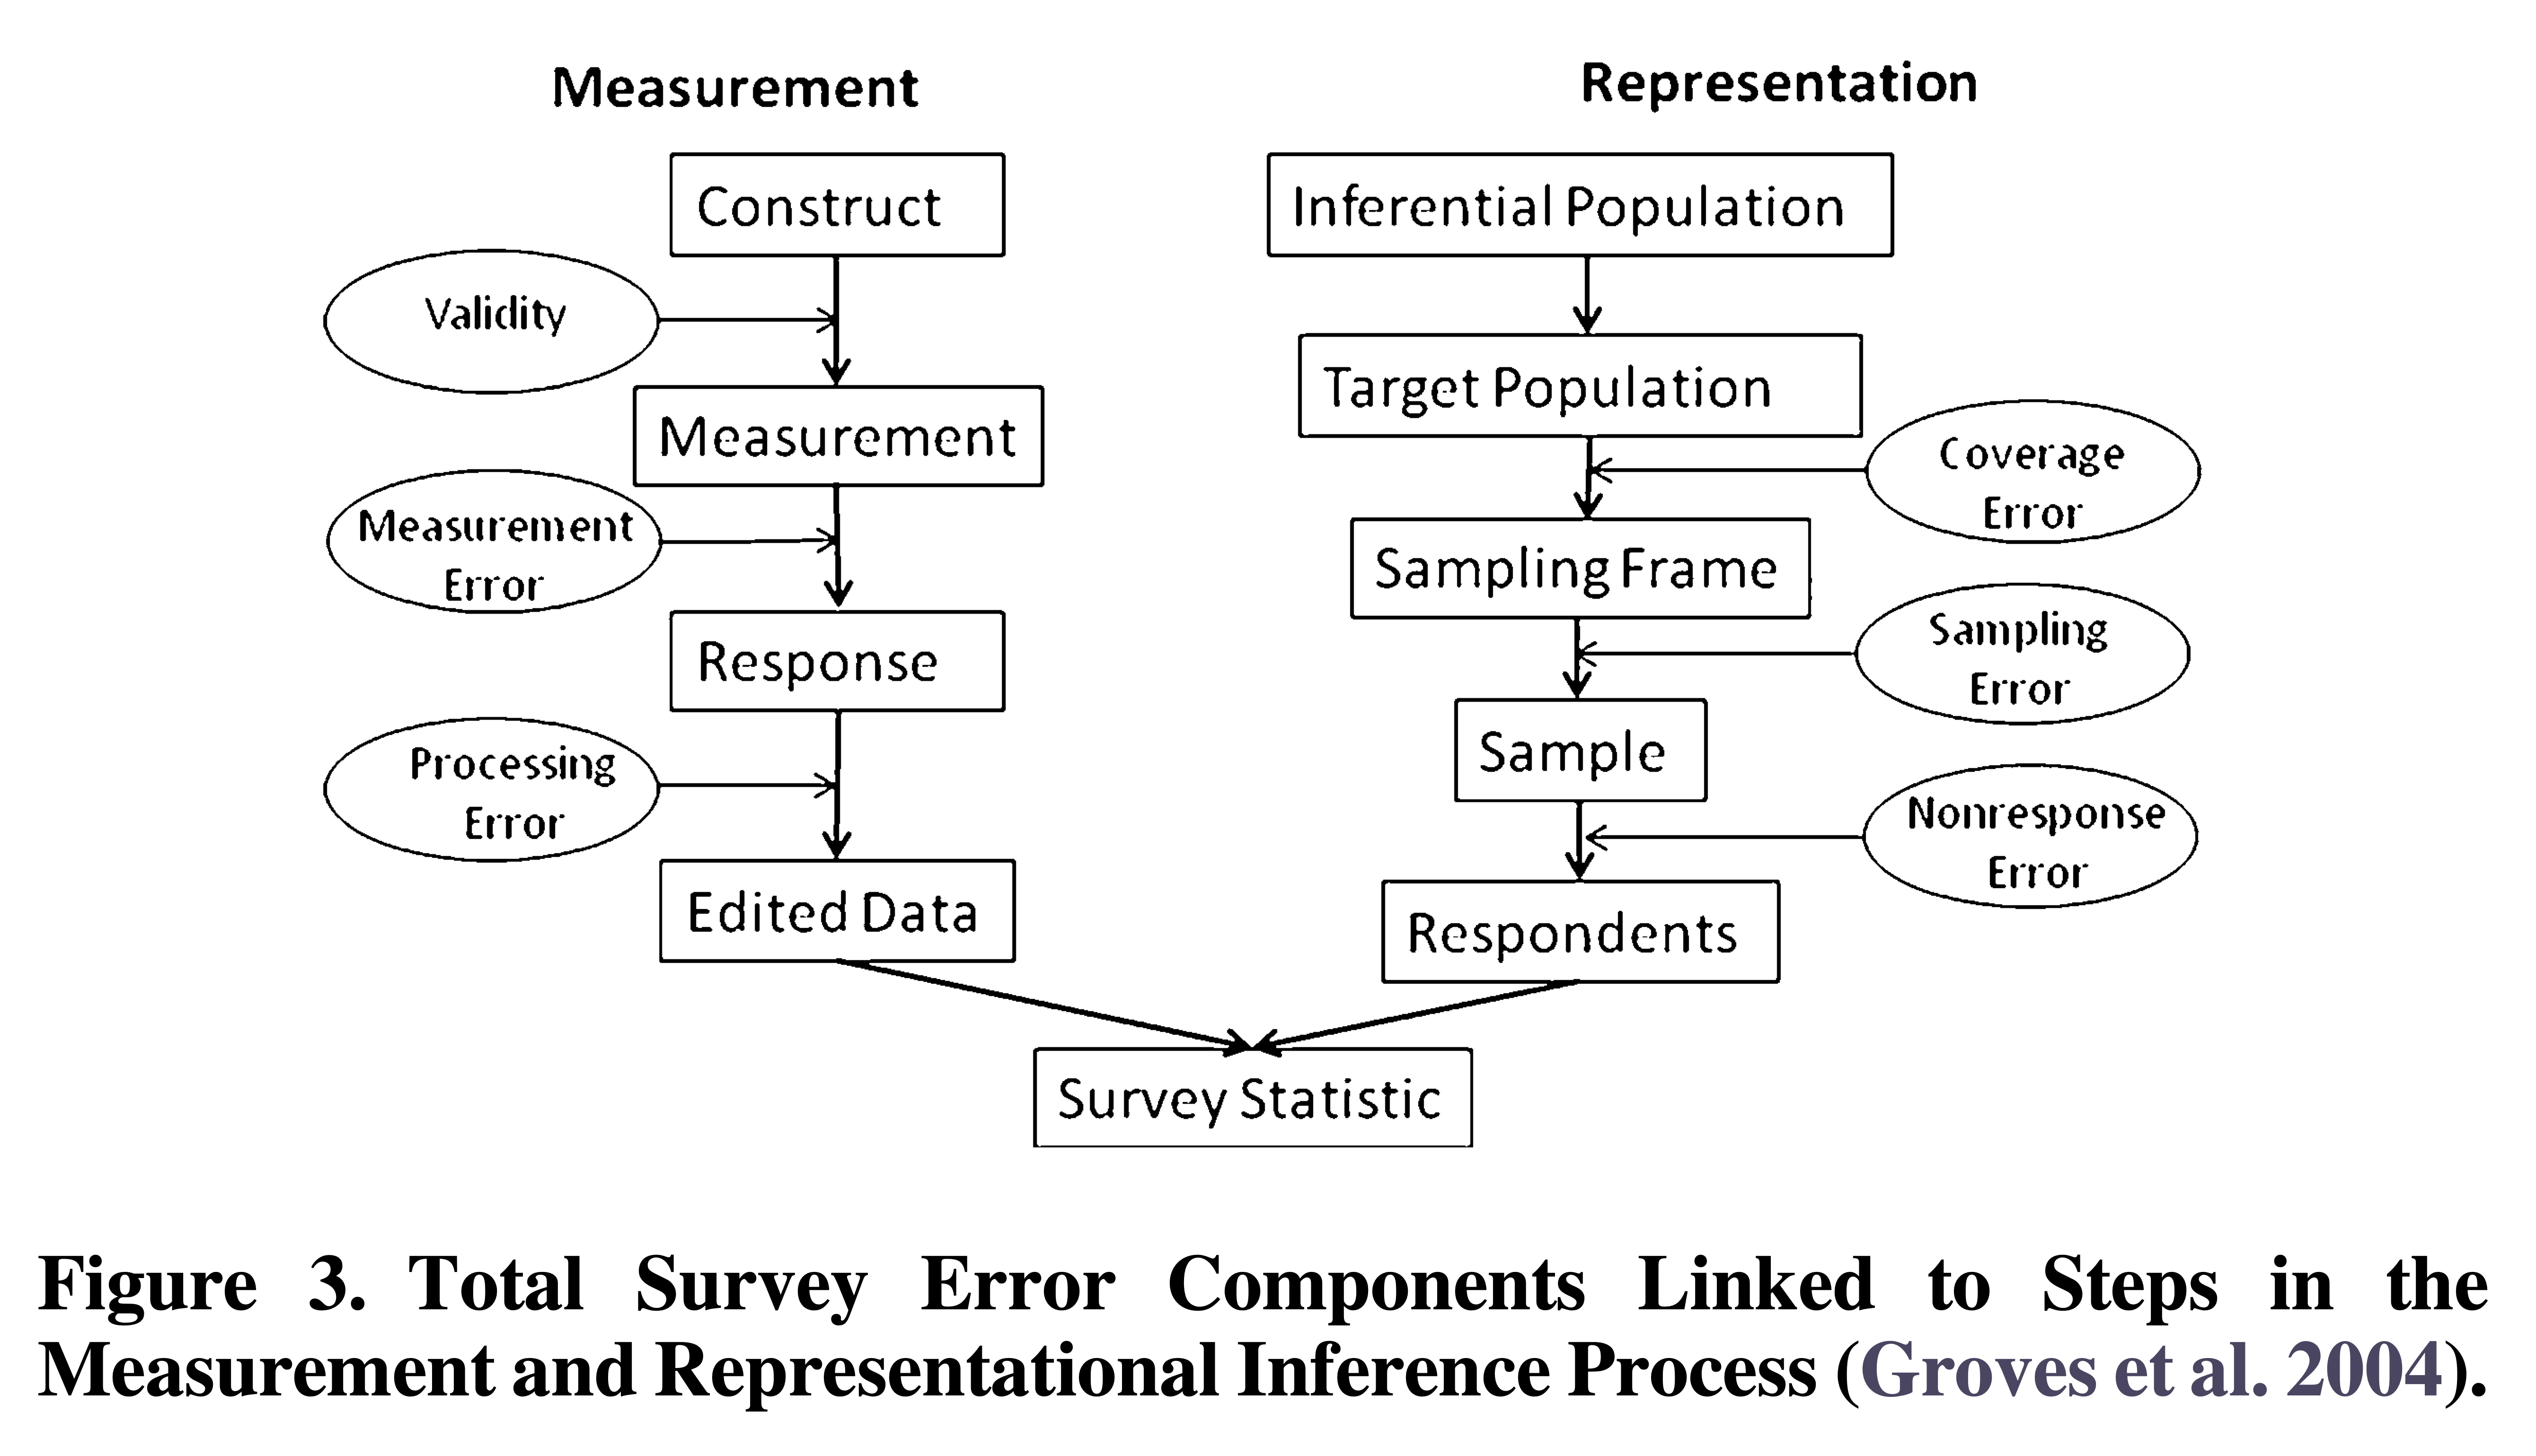 Groves, R. M., & Lyberg, L. (2010). Total survey error: Past, present, and future. Public Opinion Quarterly, 74(5), 849-879.
Untrustworthy Data Will Lead to Poor Conclusions
Trusting all data as if it were fact is a dangerous proposition. Given how data-driven decisions already impact people in very real ways, it is important to remember that “data” can be anything from deeply curated measurements to random bits of information that might bear no relationship to reality.
Questions to think about
From Practical Python Data Wrangling and Data Quality by Susan E. McGregor:
- Does the design of the data collection reflect the values of the community it is about?
- Do the members of that community know that it was collected, and did they have a meaningful way to decline?
- Has the data been evaluated for representativeness?
- Is there a way to test the data for bias?
- Are our data features accurate proxies for the phenomena we want to describe?
Real World Examples
Data cleaning
New York City Open Data reports Housing Maintenance Code Violations.
renthistory.org has reported that the string formatting is not consistent, leading to errors in databases which are sentsitive to string cases: link.
Data Journalism
There are many examples of great data journalism today. These projects often require API access or web-scraping, data cleaning and data visualization.
Here is an example from The Markup. They included their GitHub repo here!
Junk Charts
Blog discussing bad charts and how to make them better.